Note: Some devices have dual calibrations
for the heel-to-toe, arch, and width measurements. Be sure to read the
colored area which corresponds to the calibration you are fitting.
How to use a Brannock
a reference for the rest of us!
(Direct from Brannock)
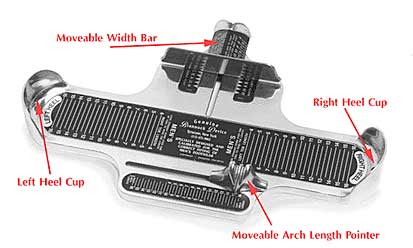
| Prepare the Brannock Foot-Measuring Device® as shown in the
photo below. The width bar should be set to its widest position and the arch
length indicator should be slid back, so the foot can be positioned easily
on the device. Note: Some devices have dual calibrations
for the heel-to-toe, arch, and width measurements. Be sure to read the
colored area which corresponds to the calibration you are fitting.
|
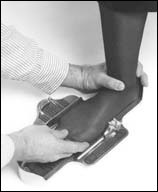
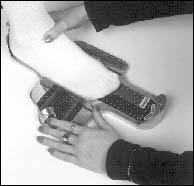
| 2. Position the Foot
Have the customer remove their footwear and stand, placing their right heel into the right heel cup. The customer should stand with equal weight on both feet to ensure that the foot being measured has elongated and spread to it's maximum size. Be sure the heel is properly located against the back of the heel cup, by grasping the customer's ankle and device together, as illustrated in photo. |
 |
 |
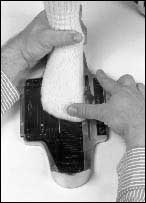
3. Measure Lengths
Heel-to-Toe Length Press the toes flat against the base of the device and look straight down over the longest toe (not necessarily the first toe) to read toe length. Make sure the customer's socks are snug against the toes (without drawing the toes back) to yield an accurate measurement. |
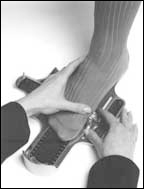
| Arch Length (Heel-to-Ball)
Place your thumb on the ball joint of the foot (as shown in the photo to the right). Slide the pointer (A on diagram) forward so the inside curve of the pointer fits the ball joint of the foot and the two high ribs come in contact with your thumb. When the pointer is properly located, the lower middle rib will be against the ball joint on the side of the foot (B on diagram). This yields the arch measurement. The arch length represented in the diagram is 8 1/2. |
 |
 |
| 4. Find the Correct Shoe Size
Compare the arch length to the heel-to-toe length. Generally you'll use the larger of the two measurements as the correct shoe size. If the arch length and heel-to-toe length are the same, this will be the shoe size. If the heel-to-toe length is larger than the arch length, then fit to the heel-to-toe size. If arch length is larger than heel-to-toe, then fit to arch length. EXAMPLE:
It is important that both measurements be taken and compared to find the proper shoe size. Simply using the heel-to-toe length may result in an improper fit.
|
 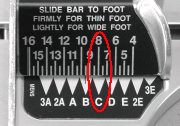 |
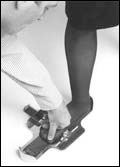
5. Measure the Width
Slide the width bar firmly to the edge of the foot. Locate the shoe size (as determined in step four) on the movable width bar and view the width measurement indicated by the properly determined shoe size. If the shoe size falls between widths, choose a wider width for a thick foot, a narrower width for a thin foot. |
| Cleaning the Device Clean tbe Brannock Device with a damp cloth. Use liquid dishwashing detergent if necessary. Do not use spray cleaners or disinfecting solutions as they may adversely affect the measuring areas of the device. |
| 6. Measure the Other Foot
Reverse the device end-for-end and measure the other foot following the steps described above. Be sure to measure both feet, then fit the larger foot. It is common to have feet of different sizes.
7. Remember the Fitting Process When used properly, the Genuine Brannock Foot-Measuring Device® is designed to indicate the correct shoe size. This is the first step in the fitting process. Due to differences in manufacturing, styling, and other variables, it is up to each fitter to be knowledgeable of shoe styles and fit characteristics. It may be necessary to make compensation in sizing to achieve a proper fit for each individual customer. The fitting process often involves trial fittings to ensure that the proper size was selected. |
 |
Junior Model
The Genuine Brannock Junior Model, shown here, is designed exclusively for children. Children's feet are constantly growing. With this in mind, the Junior Model device ensures that the shoe will fit, while allowing approximately one size for growth. The method of measurement is the same as the adult model with the exception of finding the width. Instead of utilizing a width t-bar, the Junior device uses a slide to measure the width. Position the slide so the arrows point to the size determined from toe or arch length. Then, find the width line which aligns to the widest part of the foot. |
How to Measure Infants When measuring infants, place the ball indicator to the end of the slot. Hold the heel firmly against heel cup, and rest the inner edge of the foot against the indicator. Press the toes against the device with your thumb and read the toe length. To measure the width, use the diagonal width line which comes in contact with the foot at the widest part. |
More General Fitting tips: